Monday, July 28, 2014

MDU105.2 Lighting

MDU105.2 Lighting

Lighting was something that I found to be very easy once I figured out the correct render settings. I'll admit, at first I was very worried with my render because it was very dark and shadowy, which is exactly the opposite to the desired effect when creating a fun, appealing advertisement for children. 
However, once I corrected all the settings to what the tutorial suggested, everything was perfectly fine, and the final render is lit exactly how I pictured it to be. 

MDU105.2 Scene Assembly

MDU105.2 Scene Assembly

Assembling the scene was actually very fun. To be able to determine exactly how you want the audience to view the scene during the production, and actually make that happen yourself, was a very rewarding experience. 


The only possible problem I could see with this step would be going overboard with your ideas, and straying from what the client wants and what you've both agreed to. I made sure to set the scenes as was agreed on in the storyboard. 
If I were to have deviated from the predetermined plan then the client would have every right to be upset, and I would have to go back and undo a lot of work that wasn't necessary in the first place. 

If you stick to what is agreed, both you and the client will be happy in the end. 

MDU105.2 Rigging

MDU105.2 Rigging

Rigging each object was very simple. For all the assets aside from the chest this was already done. I feel like if I had more time, I would have tried to create my own beach creature (like the crab), and attempt to rig and animate it convincingly. 


The coins were linked to the chest base, and the chest lid to the chest base also. Aside from linking the camera to the board, this was about all I needed to do in the rigging stage, and I found it quite enjoyable to play around with each object's movement range. 

MDU105.2 Texturing

MDU105.2 Texturing

After my initial treasure chest research, and my decision to change the default metal colour to more of a yellow-gold, I set to work trying to find the correct shades and tones that would work in the same way as the metal colour palette provided. 


I believe I found good colours, and I'm happy with how they turned out on the final product.


The tutorials were incredibly easy to follow, which I'm very grateful for. They explained the process of making the texture to match the UVs, how to add nice details, and Elle even taught me new techniques and hot keys that I wasn't previously aware of. I can't say that I had any trouble with this part of the production, aside from forgetting to hide the UV layer at some points during the process. 

I felt most comfortable texturing the chest than during any other part of the production so far, and I feel like it will remain my favourite to come. 
I also think that if I were to get a job in the industry of 3D animation, I'd like to focus my skills on texturing models, because I enjoyed it so much and I was genuinely excited to learn new things to better my knowledge.

MDU105.2 UV Mapping

MDU105.2 UV Mapping


The UVs were quite easy to do once I understood how to break polys properly, and how to envision them unwrapped.

Elle's videos were very easy to follow, with just some minor mishaps on my part, such as missing one snap when snapping two polys together, breaking edges on the model, etc. These were all small mistakes that were fairly easy to fix.

There was however, a major problem involving the poly snapping that I'll mention in the final blog, but it resulted in me starting my chest model all over again, at least twice.

I am now, however, very proficient at making the chest without the need for the tutorial video whatsoever, so that can only be a plus. 

MDU105.2 Modelling of Assets

MDU105.2 Modelling of Assets

The treasure chest was the only asset of the production that was left to be modelled. We were briefed to create a pirate board game advertisement, targeted for younger audiences, and so with this knowledge I knew that the chest would have to look inviting, bright, and fun.

With this in mind, and my decision to model my treasure chest after my last production blog's chest pictures, I set to work on creating a chest that I believed would be suitable for the task.

The video tutorials were easy enough to follow, with some minor problems that I'll compile into one single blog at the end of the production, but I did manage to fix them, and the result was a perfectly good treasure chest model.


Tuesday, July 1, 2014

3D Textures & Shaders: 

Firstly, I'll try to explain what the difference between the two is. 
A texture is an image that you put onto a 3D model's surface, to make it look like it has texture.
 It gives the model its colour and realistic quality. 

(Kumar, n.d.)

Like the picture above, a texture has been applied to a cube, in order to make it look like a wooden crate. Textures can be created in many different programs, and add realness to your 3D models. 

Now, a shader is a set of properties that you apply to an object, which determine things such as light reflection, light absorbency, translucency, glow, shine, etc. You can then apply textures to the shader, so that it has all the properties you just set for that shader.

Below are some examples shaders...


In some programs, there isn't actually a distinct difference between the two, but this is the difference I have learned about thus far. 

For working in the 3D Graphics industry, this knowledge is incredibly important. It's useful to know which is which, and exactly how both textures and shaders affect a 3D object.
To be able to use this to make incredibly realistic in games is awesome, and I appreciate the work that texture artists put in all the more.

---------------------------------------------------------------------------------------------

References:


3dbuzz.com,. (2004). what is the difference between shaders and textures?. Retrieved 1 July 2014, from http://www.3dbuzz.com/forum/threads/58012-what-is-the-difference-between-shaders-and-textures
Create 3D Games,. (2012). Shaders, Materials, and Textures. Retrieved 1 July 2014, from http://create3dgames.wordpress.com/2012/07/24/shaders-materials-and-textures/
Kumar, K. (n.d.). K.S.Satish Kumar Portfolio: Texturing A Mapped Model. Satish3dartist.blogspot.com.au. Retrieved 1 July 2014, from http://satish3dartist.blogspot.com.au/2010/08/texturing-mapped-model.html
Wiki.blender.org,. (n.d.). Retrieved 1 July 2014, from http://wiki.blender.org/uploads/thumb/3/30/Manual-2.5-Material-Shader-Lambert.png/320px-Manual-2.5-Material-Shader-Lambert.png


3D Graphics: Pioneers of History


Well, of course the main and most noteworthy 3D graphic pioneer would be commonly mentioned, and that's Ed Catmull. 
He's a co-founder of Pixar Animation Studios, and invented texture mapping - which is monumental for the 3D industry. 
Texture mapping is defined as "a graphic design process in which a two-dimensional (2-D) surface, called a texture map, is "wrapped around" a three-dimensional (3-D)object."(Rouse, 2010)

(Lorentzen, 2014)

"Texture maps are developed to directly correspond to the UV coordinates of an unwrapped 3D model, and are either devised from real-life photos, or hand painted in a graphics application like Photoshop or Corel Painter."(Slick, n.d.)

Other pioneers I'd like to mention are Krishnarthy and Levoy who created Normal Mapping, as well as Ofer Alon and Jack Rimokh, who created ZBrush. 
Normal Mapping is the process of making highly detailed mesh fit to low resolution polys is revolutionary for modern gaming graphics.
On the same note of gaming, the invention of ZBrush would have been amazingly helpful to all animators, to be able to easily sculpt 3D models like clay, until perfect. 

Democratisation of the 3D Graphics Industry: 

To democratise something means to make it accessible to everyone. In terms of the 3D Graphics Industry, this means to make the programs and technology available to top-of-the-line animators, graphic artists, etc., easily available to everyday artists of the same type.

The implications could be referring to the fact that with this easy accessibility of excellent software, the potential for even greater products is possible, as well as the ability to share knowledge of these programs across all fields.

Lately, NVIDIA-GRID technology is a key example of 3D graphic democratisation. The GRID includes everything needed to provide high-end graphics horsepower to almost any device, as well as the software required - and is easily transferable between industry groups. 
This is not to say it's better than having a powerful personal workstation to do your graphic art, but it opens up all new possibilities to artists everywhere with the Cloud system. 

All in all, this is a good thing I think, a great thing, to help artists tap into their full potential, regardless of their own software/device limitations. 

Emerging Technology:

"Ptex is a texture mapping system developed by Walt Disney Animation Studios for production-quality rendering:"(Ptex.us, 2014)

Ptex allows its users to complete eliminate UV Mapping, essentially removing an entire step in the 3D Asset Production Pipeline. By taking out the time needed for UV Mapping, 3D artists are able to spend more time on their textures, which Ptex has also made incredibly effortless, with the ability to make individual resolutions incredibly large and detailed. 

(Ptex.us, 2014)

It's been made easily usable, by supporting many other data types, and allowing arbitrary storage to a multitude of data. 

Ptex has been released as free open source, allowing anyone to use it and explore the software, how it works, and how useful it is in making your job easier. 

Asset creation as we know it will start becoming a lot more detailed, it will be easier for the artists, but also much more rewarding, to be able to get the desired image so easily and effectively. I believe that Ptex will be used by most, if not all animation studios soon enough, simply because it's the most logical and easy-to-use software in the industry to date. 

------------------------------------------------

References

graphics, T. (2013). The democratisation of computer graphics | Audiovisual | Creative Bloq.Creativebloq.com. Retrieved 30 June 2014, from http://www.creativebloq.com/audiovisual/democratisation-computer-graphics-10135033
Lorentzen, A. (2014). Lorentzen.se - Online portfolio of Anders Lorentzen. Lorentzen.se. Retrieved 30 June 2014, from http://lorentzen.se/anders/web/portfolio/p1202.html
Ptex.us,. (2014). Ptex. Retrieved 30 June 2014, from http://ptex.us/
Ptex.us,. (2014). Ptex Overview. Retrieved 30 June 2014, from http://ptex.us/overview.html
Rouse, M. (2010). What is texture mapping? - Definition from WhatIs.com. Whatis.techtarget.com. Retrieved 30 June 2014, from http://whatis.techtarget.com/definition/texture-mapping
Slick, J. (n.d.). 10 Pioneers in 3D Computer Graphics - The Men Behind the Breakthroughs. About.com 3D. Retrieved 30 June 2014, from http://3d.about.com/od/3d-101-The-Basics/tp/10-Pioneers-In-3d-Computer-Graphics.htm
Slick, J. (n.d.). Surfacing 101: How Texture Maps Are Made. About.com 3D. Retrieved 30 June 2014, from http://3d.about.com/od/3d-101-The-Basics/a/Surfacing-101-Texture-Mapping.htm

Sunday, June 15, 2014

3D Modelling Trends

3D Modelling in Games and Film:


For the film industry 3D models are always going to be used for special effects, explosions, or entirely animated films. 
These days films are beginning to incorporate more and more CGI (Computer Generated Imagery) to cut down on costs of production. With this, it's going to be necessary to make your 3D models look as realistic as possible if you plan on getting a job in this industry. More realistic animation of characters, clothing, objects, the implication of gravity on everything in the animation - These are all things that I've thought of that would be considered by anyone in this industry. 

However, with the high resolution needed for big films, there's also the need for texture artists to have incredibly detailed work to look really great. They at least have a near-unlimited freedom in their file sizes for each object. 


(Hockenson, 2014)

In the gaming industry, with the latest technology advances comes more realistic game experiences. Companies are striving with more immersive technology, such as the Oculus Rift, which is currently the new biggest VR feature that more and more games are striving to make their own games compatible with. 
This means all new models, rendered for each device on all different platforms, are going to be necessary in the current or near future. 

Limited technology also means limited polygon counts for 3D models, providing 3D modelling artists all new challenges to keep the high-quality picture of their games on platforms such as mobile devices. More and more games are being ported to mobile, so this is another thing to consider for 3D artists. 

Another thing to consider when it comes to mobile gaming, is the inclusion of mobile game extras to big console/PC games. Who's to say there won't be features that involve the use of your phone to play your game in a new way? For example, the way Nintendo incorporated the use of handheld GameBoys to some of their GameCube games (Final Fantasy Crystal Chronicles, Harvest Moon: A Wonderful Life, The Legend of Zelda: The Wind Waker, etc.)
Developers will need to keep these 3D limitations in mind with the way games are being revolutionised today and in the future.


Companies are also making it easier for people without the knowledge of many years in the industry to create great 3D models, that can be imported to most games. Fuse is a developing software from Mixamo that allows users to create high quality 3D game content that is easy to use, and easy to share for collaborations. 
----------------------------------------------------------------------------------------------------------------------------------

Production Pipeline for Next-Gen Game Asset:


I researched the method used to follow a production pipeline for a next-gen game asset and came across this page : http://instatuts.com/featured/pipeline-and-workflow-for-creating-a-next-gen-game-asset-shotgun/
This article is incredibly helpful in understanding the steps to take to make a game asset for the platform required. 


(Trudeau, 2010)

I won't reiterate what the author has already written in the article, but the process involves:

- Creating the basic form 
- Sculpting and optimising the mesh for normal mapping (http://wiki.polycount.com/NormalMap/)
- Adding details
- Exporting all the individual pieces for UV mapping
- Stitching and aligning the pieces
- Compiling
- Adding textures
- Making variations of the model, and 
- Finalising it all for use. 

It's very complex for me right now as a beginner, but it's incredibly interesting to research!

----------------------------------------------------------------------------------------------------------------------------------

MDU105.2 Production:

For our 3D Production assignment, we've been tasked to produce an advertisement for a board game called 'Pirate's Gold.' The storyboarding has been approved and our main task is to make the advertisement by following the production pipeline. 

All the other necessary assets have been completed, except for the treasure chest which is the central asset to the animation. We are required to complete this asset, and finish the animation. 

In class this week we started with pre-production and blocking, however I was away sick. So I've begun by researching pirate board games, pictures of treasure chests and such to get an idea of how I would want to make my treasure chest look. 


(See references for credit)
These were the few favourites that I really liked, and all have a similar design, so I think I'll try and base my own treasure chest model off these. Depending on my skill level I'll try and add more details that will hopefully not be too much.

Next step is to just wait for 3DS max to install at home (terrible download speed so it may take a very long time), watch the tutorial videos, and make myself a chest! :D

~ Dakota

----------------------------------------------------------------------------------------------------------------------------------

References:

CGTrader,. (2014). Treasure chest. Retrieved 15 June 2014, from http://www.cgtrader.com/3d-models/architectural-details/other/treasure-chest
Club Penguin Wiki,. (2014). Treasure Chest Costume icon.png. Retrieved 15 June 2014, from http://clubpenguin.wikia.com/wiki/File:Treasure_Chest_Costume_icon.png
Esselaw.com,. (2014). SocEnt Treasure Chest: Program Related Investments | Esse Law Group. Retrieved 15 June 2014, from http://www.esselaw.com/blogs/socent-treasure-chest-program-related-investments
F, D. (2013). 3D Modeling for Film and Game - Gnomon Workshop - VFX and Game Designers | The Gnomon Workshop News. Thegnomonworkshop.com. Retrieved 15 June 2014, from http://www.thegnomonworkshop.com/news/2013/03/video-games-film-whats-the-difference-its-still-3d-modeling-right/
Fleming, R. (2014). Thought 2013 was epic for gaming? Wait until you see what’s coming next. Digital Trends. Retrieved 15 June 2014, from http://www.digitaltrends.com/gaming/2014-will-good-year-game/#!ZjNwX
Hockenson, L. (2014). 4 game trends to watch in 2014. Gigaom.com. Retrieved 15 June 2014, from http://gigaom.com/2014/01/02/4-game-trends-to-watch-in-2014/
Ligman, K. (2014). Fuse adds easy character creation to Steam. Gamasutra.com. Retrieved 15 June 2014, from http://www.gamasutra.com/view/news/204434/Fuse_adds_easy_character_creation_to_Steam.php
Maucione, S. (2014). FedScoop. FedScoop. Retrieved 15 June 2014, from http://fedscoop.com/category/topics/fedscoop-radio/treasure-chest/
Onestopkidspartyshop.com.au,. (2014). Pirate Treasure Chest | ONE STOP KIDS PARTY SHOP. Retrieved 15 June 2014, from http://onestopkidspartyshop.com.au/product/pirate-treasure-chest/
Russell, K. (2014). See How Pixar Uses Apple's $US3,000 Mac To Make Beautiful Movies. Business Insider Australia. Retrieved 15 June 2014, from http://www.businessinsider.com.au/pixar-uses-apples-mac-pro-to-make-films-2014-1
SHOUT IT Ministries,. (2011). Treasure Chest. Retrieved 15 June 2014, from http://shoutitforlife.com/2011/05/15/forming-a-foundation-and-finding-freedom-in-our-faith/treasure-chest/
Shutterstock.com,. (2014). Treasure chest Stock Photos, Treasure chest Stock Photography, Treasure chest Stock Images : Shutterstock.com. Retrieved 15 June 2014, from http://www.shutterstock.com/s/%22treasure+chest%22/search.html
Store.steampowered.com,. (2014). Fuse on Steam. Retrieved 15 June 2014, from http://store.steampowered.com/app/257400/
Trudeau, A. (2010). Pipeline and Workflow for Creating a Next-Gen Game Asset | Instatuts.com.Instatuts.com. Retrieved 15 June 2014, from http://instatuts.com/featured/pipeline-and-workflow-for-creating-a-next-gen-game-asset-shotgun/
Warrior, P. (2014). Trends in mobile gaming 2014 (2/3). Medium. Retrieved 15 June 2014, from https://medium.com/@peterwarrior_az/trends-in-mobile-gaming-2014-2-3-abed2b1c1fd6
Wiki.polycount.com,. (2013). NormalMap - Polycount Wiki. Retrieved 15 June 2014, from http://wiki.polycount.com/NormalMap/
Wikipedia,. (2014). Nintendo GameCube – Game Boy Advance link cable. Retrieved 15 June 2014, from http://en.wikipedia.org/wiki/Nintendo_GameCube_%E2%80%93_Game_Boy_Advance_link_cable


Tuesday, June 10, 2014

3D Production Pipelines

This blog post is aimed to talk about all the stages of a 3D Production Pipeline.We were tasked to research this in our own time and post a blog describing what we'd discovered.


3D Production Pipeline (Animation):

Step 1: Intro - Concept Idea & Research

All of the animation studios that I looked into said that the first thing they did was get their original idea, and research how to make it look how they want it to. From researching character designs, to colours, backgrounds and everything in between, the first step in the pipeline is research.


Step 2: Script 

The next step is usually to take all of the research and ideas, and write the script. 


Step 3: Storyboarding, Music and Dialogue

The script is then given to the storyboard artists, where they then take the words of the script and turn them into pictures and actions. The storyboard then has to get approved by the directors and producer, to then be turned into a story reel, so that you can see how everything flows together. 
Music and dialogue are then incorporated, and for months following, the overall look of the animation is given life, to be tweaked and refined later.


Step 4: Visual Development

The story reel is then taking by a visual department, where the overall look of the film (style, tone, colour, etc.) is designed and decided for every sequence. This process involves thousands of drawings of each individual item in the animation, big and small. 


Step 5: Casting / Voice Recording

Voice actors are chosen for their voices, not their looks. While recording the dialogue scenes, the voice actors may be video recorded as well to give artists a reference for facial expressions for their animated characters. 


Step 6: Modelling 

Modelling artists digitally sculpt each object in the animation, starting with a wire frame structure, also known as an armature, which is used to break the character's design down into workable shapes, so that it can be rigged to move in whatever way necessary. 


Step 7: Rigging

"Riggers" get the 3D model of the objects and characters, and decide how they should move, by determining where the bones, muscle and fat would be and how realistic their movements should be. They incorporate joints and pivot points, to make the character (face, body, hair, clothes, objects) move convincingly. The rigger then work with the animation department to make an extensive set of controls so that they can animate every part of it for the animation.


Step 8: Layout

The first step in the layout is the animatic, where artists draw basic shapes, backgrounds, etc., to determine how each scene will play out. This helps make the final decisions for character placement, camera angles, movement, timing, lighting, and so on. The animatic should map out the entire movie before the animating process begins. 


Step 9: Character Animation:

This is where the controls created in the rigging phase are used to animate each character in the scenes. They match the actions of the character to the dialogue, perfect the timing, and so forth. 


Step 10: Surfacing

Surfacing artists add colours and textures to the animations to make each object look more realistic to the desired effect. (Wool, hair, metal, dirt, etc.)


Step 11: Effects

Animations are applied to all things that aren't 'living' characters (trees, fire, waves, wind, etc.)


Step 12: Lights

Lighting effects are added to everything, it illuminates the whole scene and sets the atmosphere that supports the whole story. It leads the viewer's eyes to the main critical elements of the frames so the audience's attention is drawn to the exact spot the storyteller wants them to look. 


Step 13: Sound FX:

Sound designers record and make sound effects to add to the animation, such as rustling leaves, wind howling, footsteps, etc. 
The next step in this process is to add the music, this part is crucial in getting the audience to connect with any emotional parts of the story.


Step 14: Final Mix:

The final step is to assemble the dialogue, music and sound effects into the film, and adjust them accordingly to be added as tracks and mixed into the final film.

3D Production Pipeline (3D Modelling):

Step 1: Pre-Production:

The initial phase of making a 3D model, where the concept ideas for overall look, style, etc., are determined for creation. 

Step 2: Modelling:

Going off what was decided in the pre-production stage, modellers then start building the assets from scratch using a variety of 3D modelling methods and programs. Every 3D asset can be made from characters to props, backgrounds, miscellaneous objects, etc. 

Anything that will be used later on in the pipeline is made in this stage. 

Step 3: Painting and Texturing:

A texture artist will then take the 3D models and give them colours and texture. It's possible to add a variety of different textures to enhance the realism of the objects, including how reflective or shiny an object is for example. 

Step 4: Rigging:

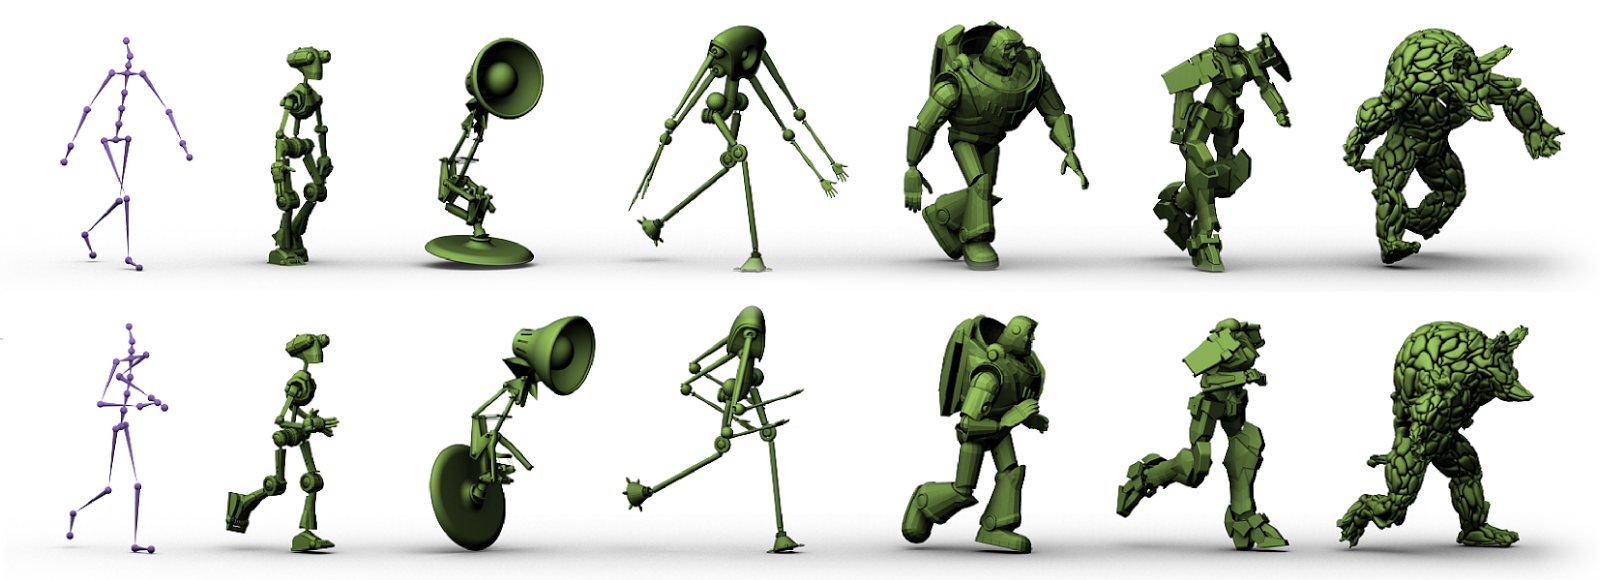
Control points are created on the 3D models, to result in a skeleton of sorts, that the animators can then use to move the objects and characters how they like, in whatever way is believable in the animation. 
These rigs are a necessity to any animated 3D models. 

(Bharaj, Thorm, Seidel & Theobalt, 2011)

Step 5: Animation:

The animation skeleton created previously is then used in the animation, to move the characters and objects in whatever way needed. 

"It is an animator's job to make the 3D characters and objects come to life in a believable way." (Boudon, 2013)

Step 6: Dynamics:

This step is where simulations and real-world forces are created, such as models shattering on impact, explosions, etc. 

Step 7: Lighting:

This is where the light in each scene is determined, and how it works in correlation to each object in that scene. The direction the light is coming from, how strong the light is, what colour it is, all is determined in this step. 

Step 8: Rendering:

This is the process where you take the 3D object you have created, and output the files for it to be used in a variety of ways. (Photo, animated film, portfolio) 
This is where you add the finishing touches that make your object look its best. Adding shadows, lights, other textures or details until you achieve the end result you're after. 


----------------------------------------------------------------------------------------------------------------------------------

Researching this process has been incredibly helpful in understanding exactly what animation studios must go through to create a good animated film and 3D models. The amount of time and effort spent on such a task is awe-inspiring. I'll make sure to remember this process if I'm ever going to criticise a single animation again!


~ Dakota Jade ~

------------------------------------------------------------------------------------------------------------

Bharaj, G., Thorm, T., Seidel, H., & Theobalt, C. (2011). Automatically Rigging Multi-component Characters. Resources.mpi-inf.mpg.de. Retrieved 15 June 2014, from http://resources.mpi-inf.mpg.de/AutoRig/

Bim, J. (2002). What is 3D Rendering?. 3drender.com. Retrieved 15 June 2014, from http://www.3drender.com/glossary/3drendering.htm

Boudon, G. (2013). How Does a 3D Production Pipeline Work - Understanding th Basics. Digital-Tutors Blog. Retrieved 15 June 2014, from http://blog.digitaltutors.com/understanding-a-3d-production-pipeline-learning-the-basics/

Dreamworksanimation.com,. (2014). DREAMWORKS ANIMATION. Retrieved 15 June 2014, from http://www.dreamworksanimation.com/insidedwa/productionprocessJimovelmen.com,. (2014). Untitled Document. Retrieved 15 June 2014, from http://jimovelmen.com/csula/syllabi_use/Art498_Spring10_supp.htm

Playgallery.org,. (2014). PLAY Stories: Classes & Assignments: the production pipeline of a 3D animation. Retrieved 15 June 2014, from http://playgallery.org/stories/animation/